Painted Stairs – A stunning way to transform your space

Painted stairs, a fun project I’m excited to share here today.
If you’ve ever contemplated zhushing up your stair treads with a fresh coat of paint, today’s post is for you!
painted numbered staircase

Our Painted Stairs Reveal

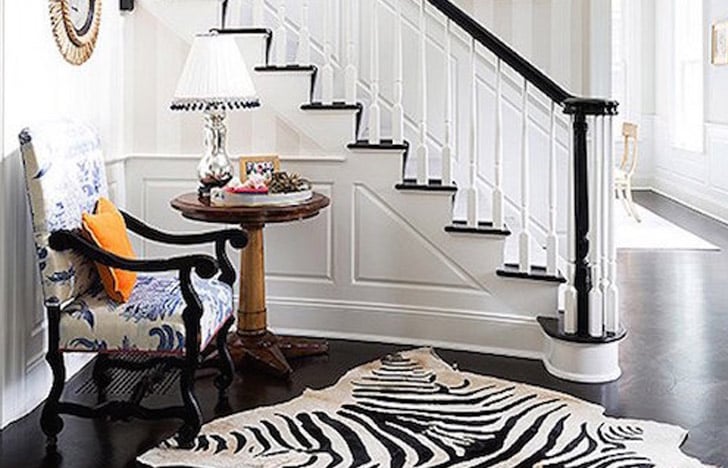
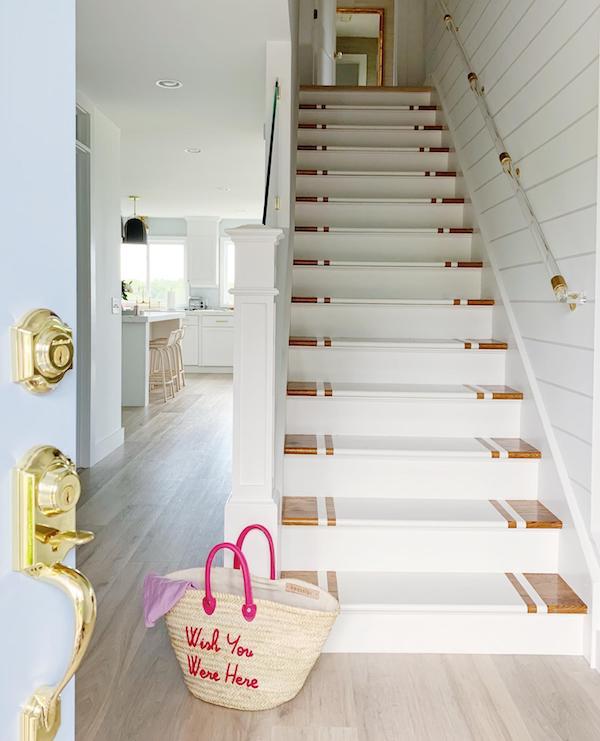
This is our back staircase.

The first time I wrote about this was way back in March, 2010, I did a post about the “before” stairs along with various painted staircase ideas.

Checking out different ideas online is always the first thing I do with any of my diy projects.

Since these steps only lead to the home gym on the second floor over our garage, I thought adding a paint color here would be a great way to do something a little out of the ordinary.

It’s amazing what a fresh coat of paint can do…

I looked at a lot of different inspirational images, and eventually chose a hybrid.

It took me forever to get this project accomplished, and it’s still technically not done.

Our interior designer Lauren, helped me to narrow down my ideas a little bit, pick some paint colors and find a skilled painter familiar with the specialist floor paint needed here.

Using the right paint is key here and the best way to approach a project like this.

As you can see here, this particular staircase is a bit unique in that there are no newel posts.

So, I sourced the banister stair rails by using window hardware from Restoration Hardware and the rope is from my local hardware store.

However, now that I’ve seen the finished project, the only thing I would change is to get some sturdier rope, probably from home depot.

Does anyone know of a good source?

PS: Why it’s ok to paint over hardwood wood floors!

painted stairs with numbers on risers
What do you think of our painted stair runner, would you try this idea?
I’m pretty happy with the way it looks, it’s so fun and eye catching!
If you’re going to try this idea – be sure to fill in any gaps or small holes with wood filler first to achieve the most seamless look.

In fact, I asked our painter if he could give a me a step by step guide for painted stairs, here’s what he had to say.

Materials and Tools:

  1. TOP TIP –:Choose a high-quality paint that is durable and suitable for stairs. Consider using floor or patio paint for added durability.
  2. Primer: If your stairs are bare wood or have a dark color, use a primer to ensure better paint adhesion.
  3. Sandpaper: Sand the stairs to create a smooth surface for painting.
  4. Painter’s Tape: Use painter’s tape or frog tape to protect areas you don’t want to paint, such as the walls or the railing.
  5. Drop Cloths or Plastic Sheets: Cover the surrounding area to protect it from paint splatter.
  6. Paint Tray and Roller: A paint tray and roller can make the painting process faster and more efficient.
  7. Paintbrush: Use a high-quality brush for cutting in and painting edges.
  8. Stir Stick: Stir the paint thoroughly before starting.

Step-by-Step Guide:

  1. Prep work:
    • Remove any old carpet or existing finish from the stairs.
    • Clean the stairs thoroughly to remove dust and debris.
    • Fill any holes or cracks with wood filler and sand the surface to create a smooth finish and the most seamless look.
  2. Sand the Stairs:
    • Sand the stairs to roughen the surface slightly. This helps the paint adhere better.
    • Wipe away any dust with a damp cloth.
  3. Apply Primer (if needed):
    • If your stairs are bare wood or have a dark color, apply a coat of primer and let it dry completely.
  4. Tape and Protect:
    • Use paint tape to protect the edges of the stairs, the walls, and any other areas you don’t want to paint.
    • Cover the surrounding area with drop cloths or plastic sheets to prevent paint splatter.
  5. Start Painting:
    • Stir the paint thoroughly.
    • Use a brush to cut in and paint the edges of the stairs.
    • Use a roller for the main flat surfaces. Work from the top of the stairs downwards.
  6. Allow to Dry:
    • Follow the drying time recommended on the paint can between coats.
  7. Apply Additional Coats (if needed):
    • Depending on the color and type of paint, you may need to apply additional coats. Follow the recommended drying time between coats.
  8. Remove Tape and Clean Up:
    • Once the paint is dry, carefully remove the painter’s tape.
    • Clean your brushes and rollers according to the instructions on the paint can.
  9. Allow for Cure Time:
    • Even though the paint may feel dry, it’s essential to allow sufficient cure time before heavy use. Especially in high-traffic areas. Follow the paint manufacturer’s recommendations.

Remember to follow safety guidelines, work in a well-ventilated area, and use appropriate safety gear, such as a mask and goggles, especially if you’re working with chemicals or sanding materials.

painted stairs in beach house.

We ended up loving this idea so much we painted the stairs in our former beach house, seen above.

Additional home project ideas:

If you’re looking for even more paint ideas and home design inspiration, be sure to check out these other posts by clicking on each title below-

Don’t miss this post for even more helpful paint colors for your home’s trim.

How to zhush up your front door.

The best dining room mirror ideas.

Sherwin Williams Repose Gray paint review.

The best paint color for white walls.

before shot of staircase
the “before” shot – of our wooden stairs with our plain bare wood old stair risers
numbered stairs with rope
The inspiration aka the original painted stairs idea I love how the natural wood still shines through here.

Hope you loved this somewhat quirky home decor idea!

A few more things…

Design lovers! Have you joined our fun and VERY helpful design Facebook group?

In this private group, members share photos with their design questions and dilemmas from their own home. We all chime in with our best advice!

It’s also great for sourcing hard to find items and pieces.

Lastly, to help you even further with your home projects, download my FREE DESIGN CHEAT SHEET, it’s loaded with all sorts of quick tips and handy measurements.

Click here to grab that, it’ll be super helpful!

From a Little Girl Room To A Big Girl Room: Bedroom Makeover How To

In today’s blog post I’m talking all about my daughter’s bedroom transition from a little girl room to a big girl room.

Before and After My Daughter's Bed Room


Makeover From Little Girl Room To Big Girl Room

 
My daughter’s room makeover from little girl room to big girl room is finally done!

Excited to share her new room with you here today. 

 
Back in March I posted the “befores”, the sweet little girls room I lovingly put together for my baby girl on her second birthday.
 
As you can see, we never did the whole toddler bed transition but went straight to a new bed for her, in the form of a large full-sized bed. 
 
This big change is not as crazy as it sounds, we did use side bumpers for the first few months on her big bed, and now she has a bed which will last her into her high school years!
 
We did consider going with the popular Pottery Barn bunk beds but eventually decided it was not a good idea for her room because we weren’t sure we had enough space. 
 
This type of big kid bed made the most sense for our family, as it’s a great way to get the most mileage out of kids rooms.
 
A larger mattress might be the best way to go, especially if you might need the room to do double duty as guest room.
 
We did the same thing for our other two kid’s room and it all worked out fine!
 
My son did get a twin bed first, but we switched him to a bigger bed with a hidden trundle bed, when we moved to our new house a couple of years ago.


Now that my daughter is almost twelve, this new grown up version seems much more appropriate, despite the fact that seeing her old room here (below) still gets me emotional! 


Keep Reading